![]()
Record Text to Speech (iOS 13)
Record text to speech from your iOS device.
Information
Required Apps
Scan using your iPhone's camera to download
Description
Record Text to Speech
Record Text to Speech works with the Screen Recording feature of iOS to capture high-quality audio of Siri speaking aloud your inputted text.
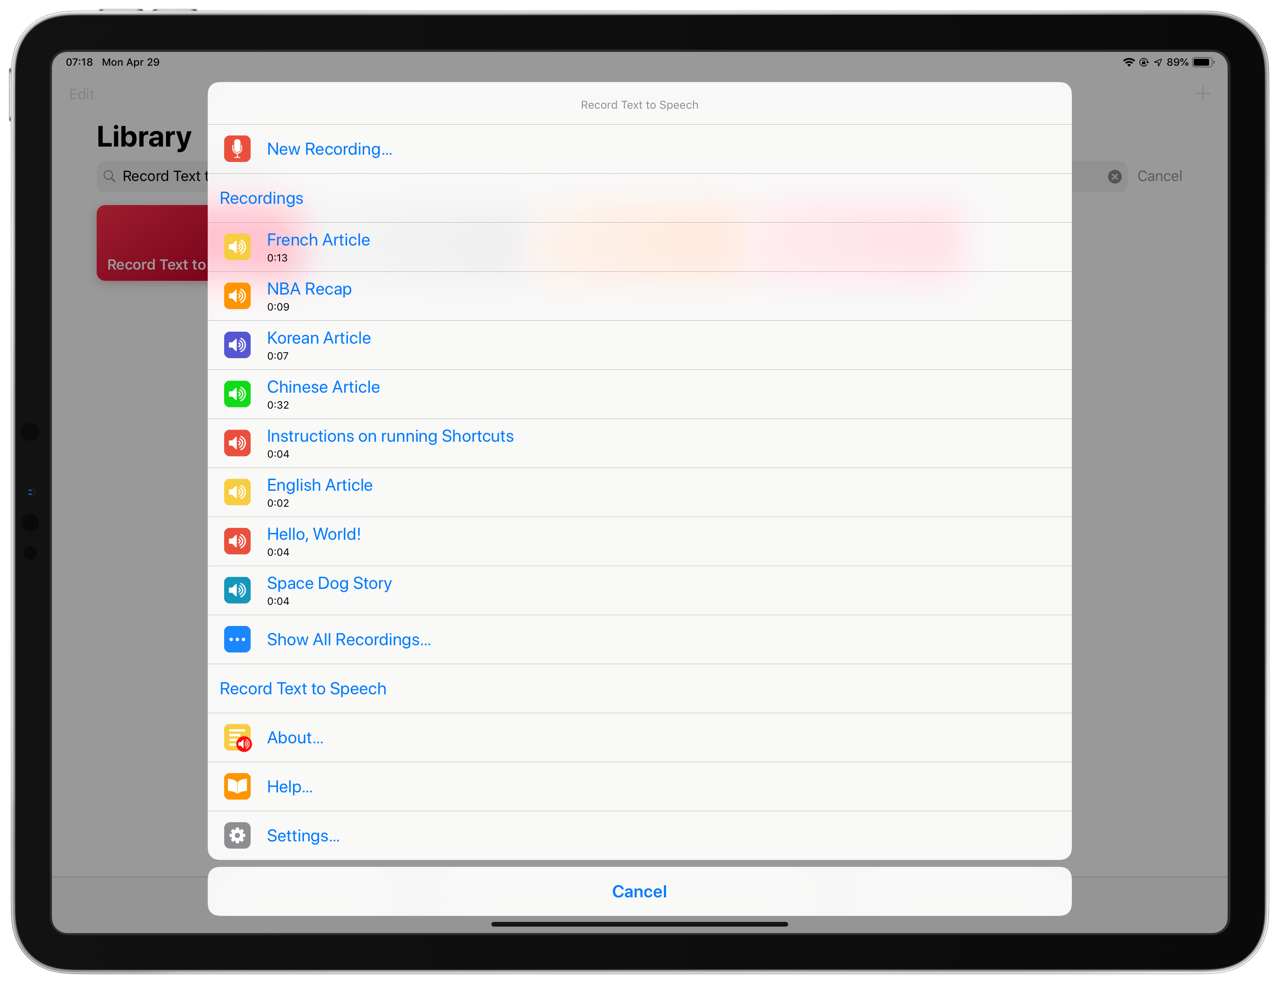
Table of Contents
- Overview
- System Requirements
- Download and Installation
- Getting Started
- Interface
- Editing Recordings
- Share Menu
- Settings
- Errors
- Framework
- Localization
- Version History
- License
Overview
Record Text to Speech makes it easy to create high-quality audio recordings of Siri speaking aloud text. The shortcut supports speaking text in the following languages and dialects:
- Arabic (Saudi Arabia)
- Chinese (China Mainland)
- Chinese (Hong Kong)
- Chinese (Taiwan)
- Czech (Czechia)
- Danish (Denmark)
- Dutch (Belgium)
- Dutch (Netherlands)
- English (Australia)
- English (Ireland)
- English (South Africa)
- English (United Kingdom)
- English (United States)
- Finnish (Finland)
- French (Canada)
- French (France)
- German (Germany)
- Greek (Greece)
- Hebrew (Israel)
- Hindi (India)
- Hungarian (Hungary)
- Indonesian (Indonesia)
- Italian (Italy)
- Japanese (Japan)
- Korean (South Korea)
- Norwegian (Norway)
- Polish (Poland)
- Portuguese (Brazil)
- Portuguese (Portugal)
- Romanian (Romania)
- Russian (Russia)
- Slovak (Slovakia)
- Spanish (Mexico)
- Spanish (Spain)
- Swedish (Sweden)
- Thai (Thailand)
- Turkish (Turkey)
After recording, you can trim the audio prior to saving the audio file in iCloud Drive. Share them via email, text message, and other services from the standard Share menu.
System Requirements
Record Text to Speech requires:
- iOS 12 or higher
- Shortcuts 2.2 or higher
Shortcuts also requires access to your Photos library, when your text to speech recordings are temporarily saved to.
Download and Installation
Download the latest version from RoutineHub.co:
Adding Screen Recording to Control Center
Record Text to Speech works best when you can easily access Screen Recording from Control Center. If Screen Recording is not in your Control Center, perform the following steps to add it:
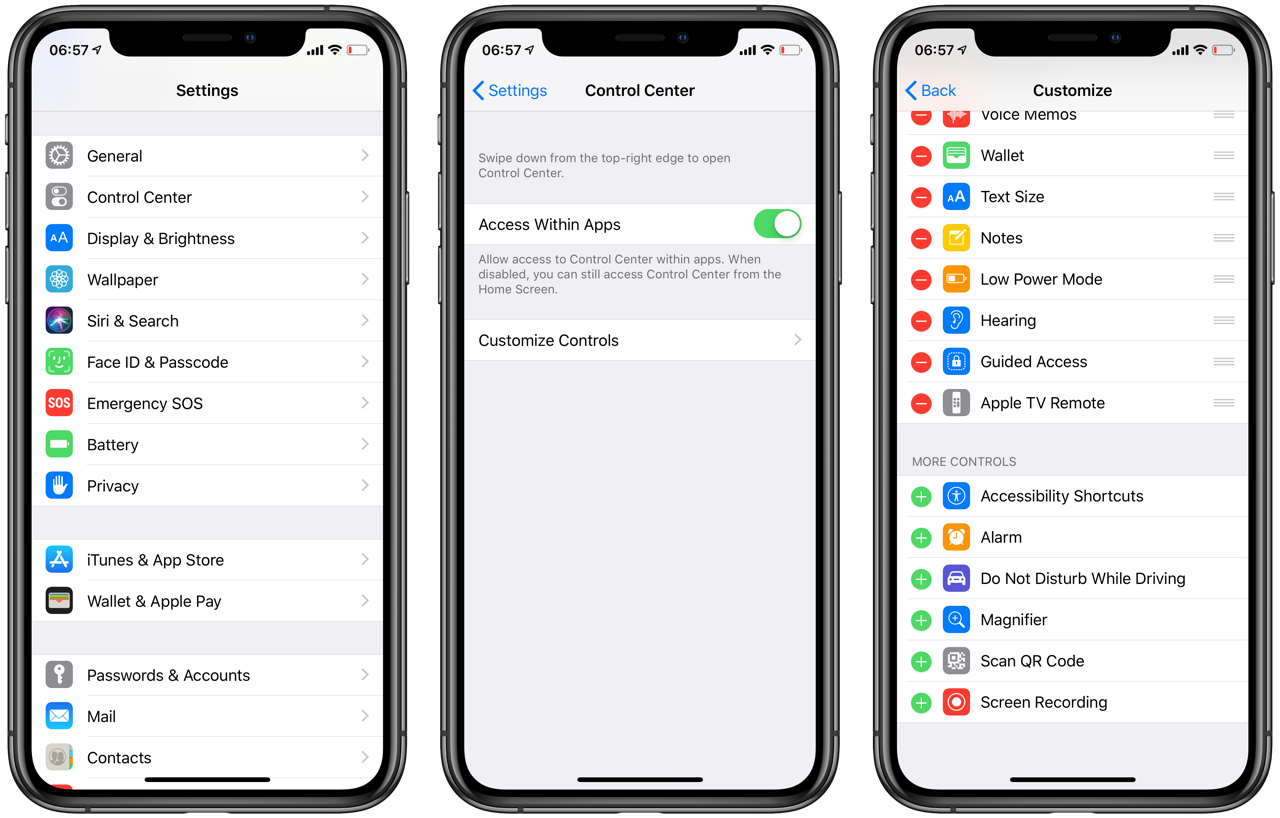
- From the iOS Home Screen, tap Settings.
- Tap Control Center.
- Tap Customize Controls.
- Tap + next to Screen Recording.
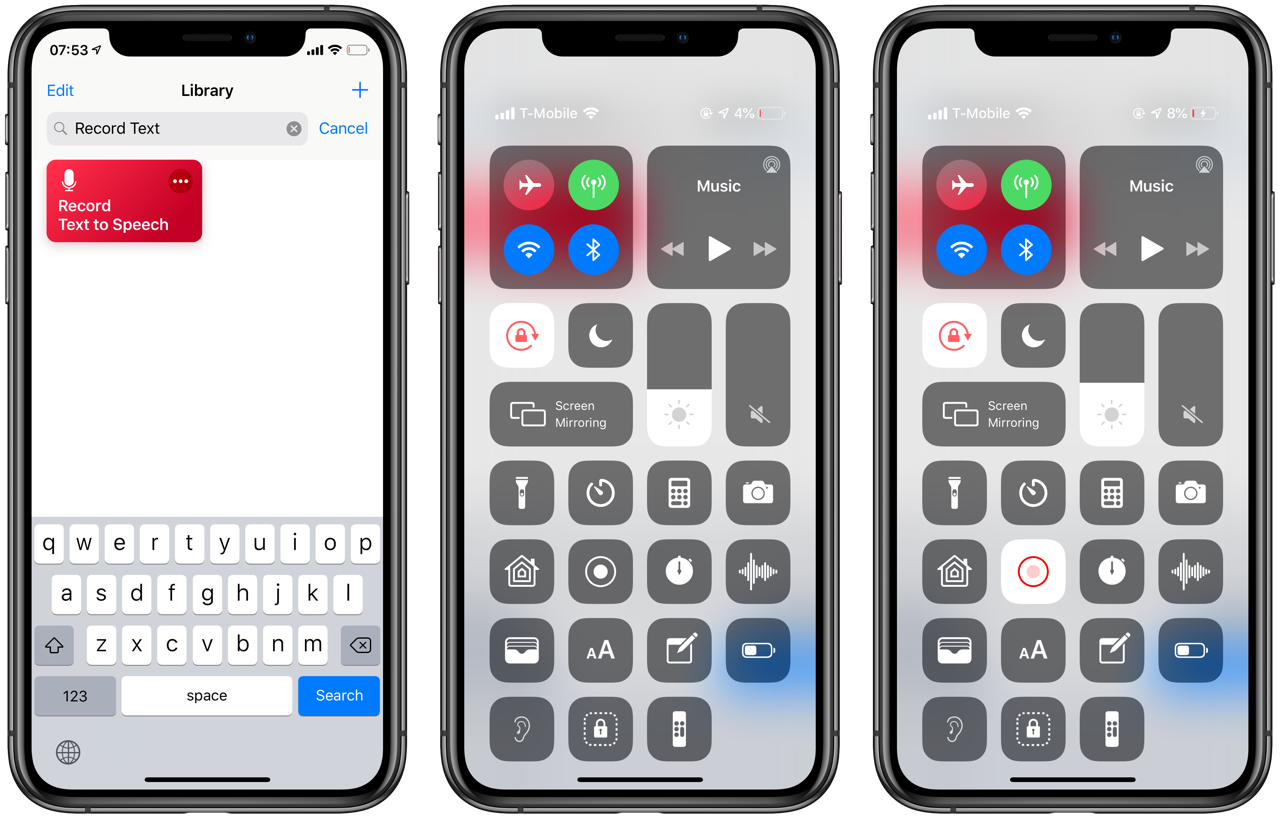
To access Control Center, swipe up from the Home Button if your iOS device has a Home button. Otherwise, swipe down from the top-left of the screen, usually where the battery indicator is located.
The Screen Recording Icon looks like a circle with a solid white filled circle in the middle. When recording, the circle will turn red, and a red pill-shaped button will appear in the iOS status bar.
Creating Your Text to Speech Recording
Let's create your first text to speech recording.
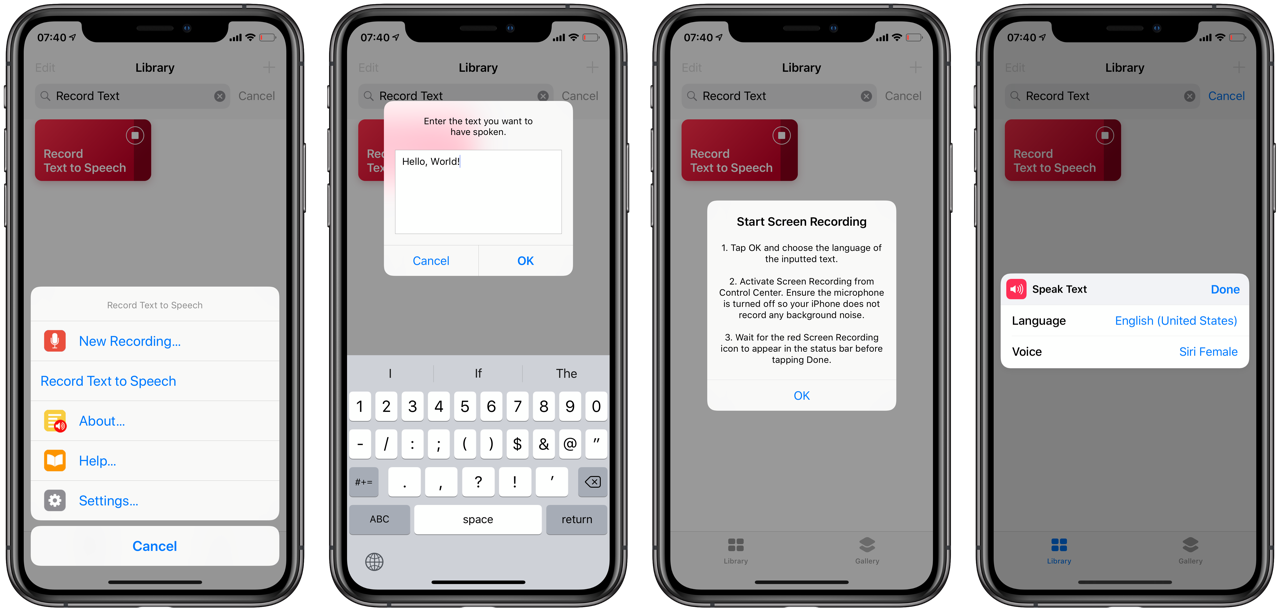
- From the Record Text to Speech home screen, tap New Recording….
- Enter the text you want to have spoken.
- If Display Hints is enabled, instructions will appear on screen. Tap OK to dismiss the alert.
- Choose the language of your inputted text.
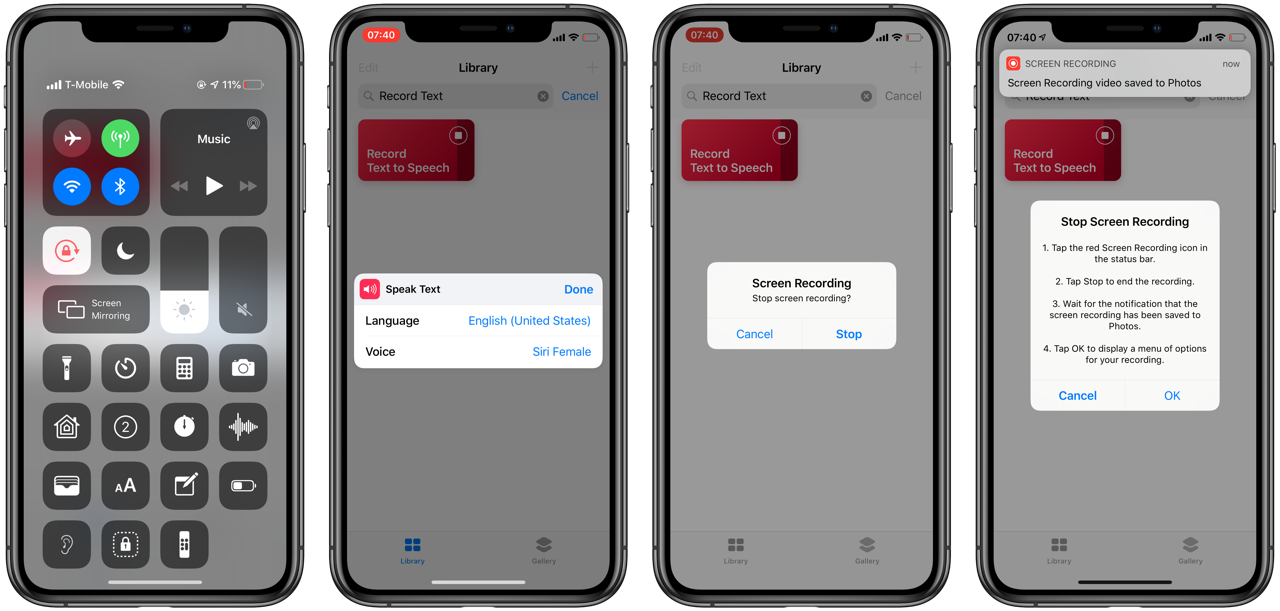
- Activate Screen Recording from Control Center.
- Wait three seconds until the red Screen Recording icon appears in the status bar of your iOS device.
- Tap Done.
- Shortcuts will now speak your text.
- When Shortcuts has finished speaking, additional instructions will appear in an alert.
- Tap the red Screen Recording icon in the status bar.
- Tap Stop to stop the screen recording. Wait for the notification from iOS that the recording has been saved to Photos before proceeding to the next step.
- Tap OK to dismiss the instructional alert.
Next, a menu will appear with the following commands to perform on the text to speech recording. The screenshot below shows the screens that appears when you choose the Save Audio command.
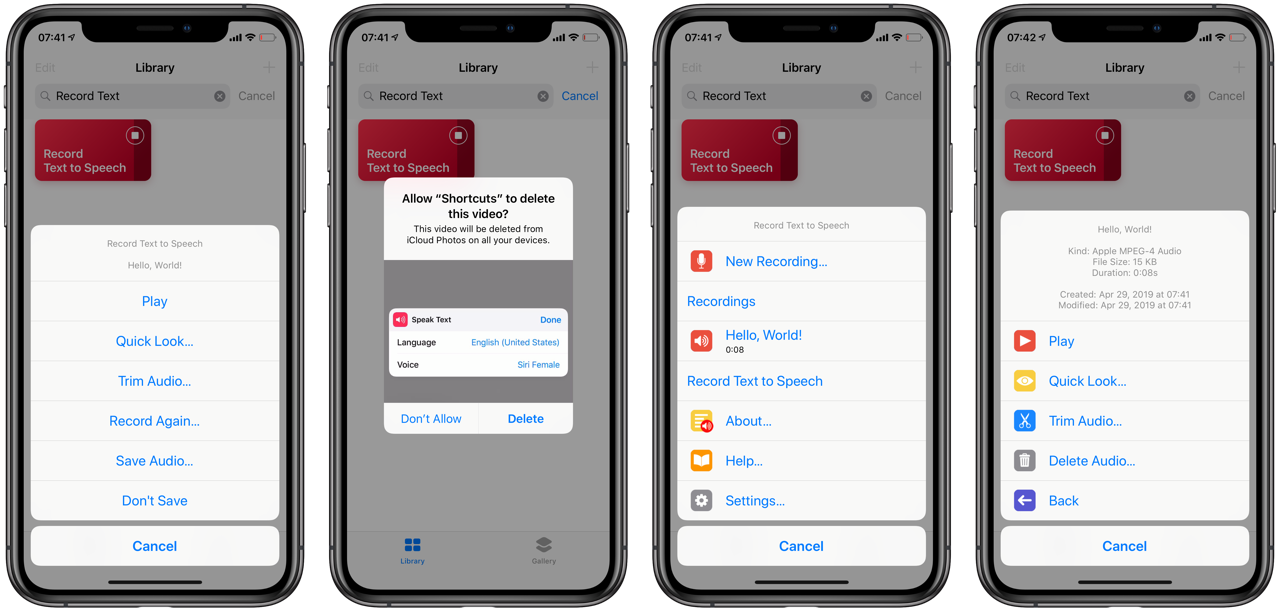
- Play: Play the audio recording.
- Quick Look: Display a Quick Look interface for the audio recording.
- Trim Audio: Display an editing window so you can trim the beginning and end of the audio clip.
- Record Again: Discard the current recording and re-enter the text to be spoken and recorded.
- Save Audio: Save the current audio recording to the Record Text to Speech folder in
iCloud Drive/Shortcuts. This command will prompt you to enter a filename for the audio recording. Newlines, tabs, periods, quotes, colors, and semicolons are not allowed in the filename. - Don't Save: Discard the current recording and return to the Record Text to Speech Home screen.
When you choose the Record Again, Save Audio, and Don't Save commands, the Photos apps will prompt you to delete the Screen Recording that was just recorded. Files are saved in the iCloud Drive/Shortcuts/Record Text to Speech folder, so you don't need the screen recording in Photos anymore.
Exploring the Record Text to Speech Interface
When you open to the Record Text to Speech Home screen, you're presented with the following sections of information:
- New Recording: Create a new text to speech audio recording.
- Recordings: Display a list of recent recordings that you have previously recorded. Recordings are sorted by creation date.
- Show All Recordings: Tap to display more recordings that you have recorded.
- About: Display the About screen with the version and build number.
- Help: Display the documentation you are reading now.
- Settings: Adjust settings for the shortcut.
Editing Recordings
Tap on a recording from the Recode Text to Speech Home screen to edit it.
- Play: Play the audio recording.
- Quick Look: Display a Quick Look interface for the audio recording. You can then tap the Share button to send the audio recording via text message, email, etc.
- Trim Audio: Display an editing window so you can trim the beginning and end of the audio clip.
- Delete Audio: Delete the current audio recording from the
iCloud Drive/Shortcuts/Record Text to Speechfolder. - Back: Returns to the Return Text to Speech Home screen.
Share Menu
In addition to running Record Text to Speech from the Shortcuts Home screen, you can access it from the Share Menu on Text and Rich Text in one of two ways:
Selected Text
- Select text on a page.
- Tap and choose Share.
- Tap Shortcuts.
- Choose Record Text to Speech.
- Follow the on-screen instructions to create an audio recording of the selected text.
Share Menu
- Tap the Share icon.
- Tap Shortcuts.
- Choose Record Text to Speech.
- Follow the on-screen instructions to create an audio recording of text rendition of the item being shared.
Note: iOS must switch to the Shortcuts app in order for Screen Recording to properly record the text to Speech audio.
From Other Shortcuts
You can also invoke Record Text to Speech from other shortcuts by supplying it with a Text Action prior to calling the Run Shortcut Action.
Settings
Tap Settings from the Home screen to edit Record Text to Speech's settings.
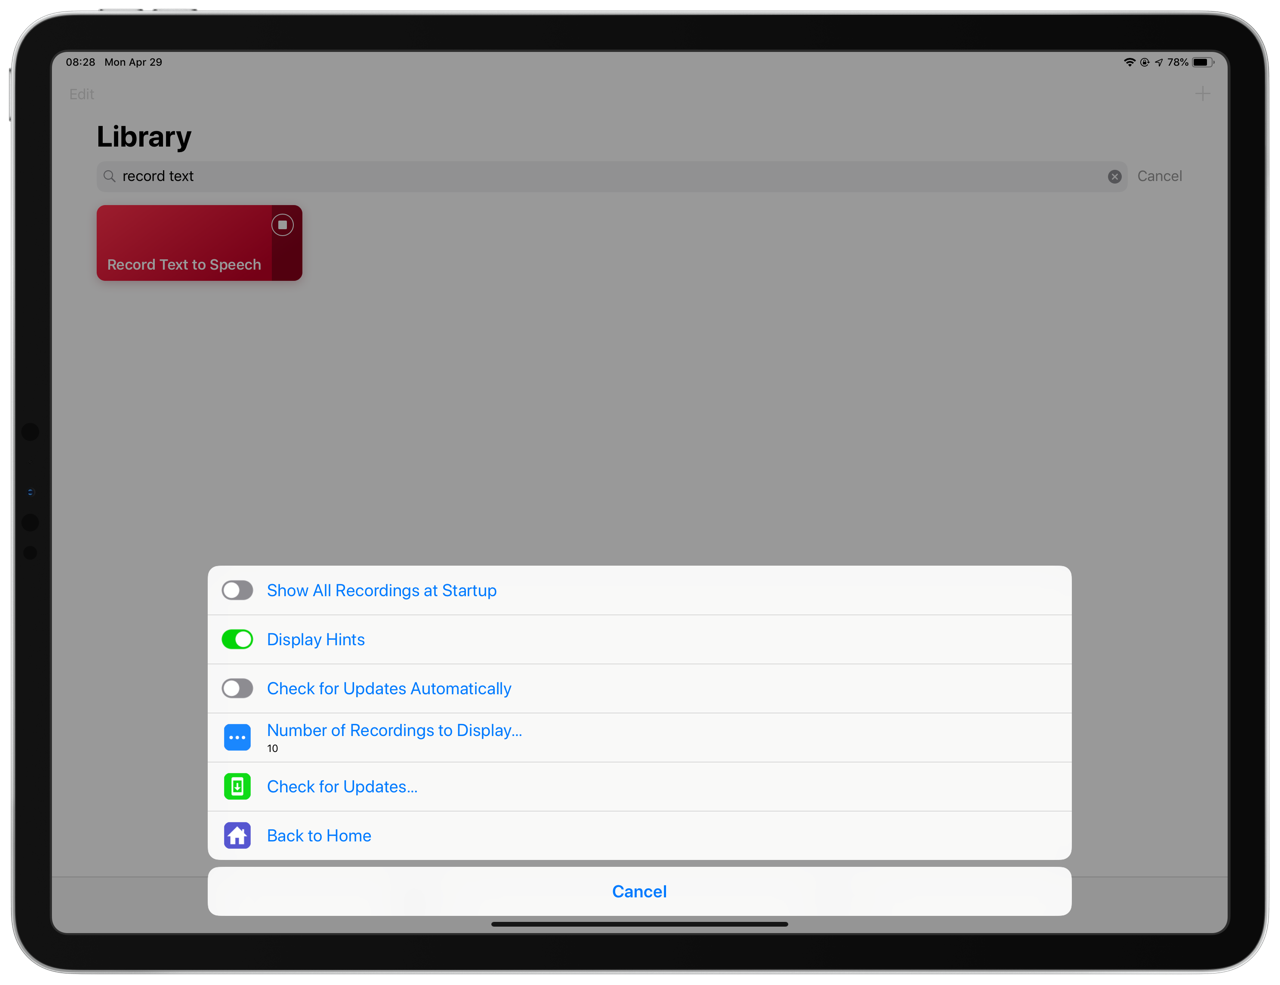
- Show All Recordings at Startup: Display all recordings when Record Text to Speech starts up. By default, the shortcut will display the last 10 recordings.
- Display Hints: Show instructions before displaying the Speak Text action dialog.
- Check for Updates Automatically: Check for updates when Record Text to Speech launches.
- Number of Recordings to Display: If Show All Recordings at Startup is disabled, this preference allows you to set the number of recent recordings that will be displayed at launch.
- Check for Updates: Manually check for updates to the shortcut.
- Change Language: Change the language for the shortcut.
- Back to Home: Return to the Record Text to Speech Home screen.
Handling Errors
If you forget to start or end recording the Screen Recording, an error dialog will appear when you tap Done. You'll have to re-record the text in order to save the recording.
App Framework
Record Text to Speech was developed using the Shortcut App Framework approach to developing application-like shortcuts. This framework was also used to develop:
- Cronios: The shortcuts scheduler for iOS.
- GeoCuts: Run shortcuts automatically based on your location.
- WatchCuts: Trigger shortcuts on your iPhone and iPad using any of your iCloud-connected devices: iPhone, iPad, Mac, Apple Watch, or iCloud.com!
- LaunchCuts: Folders and tags for your organizing and launching your shortcuts.
- Inspector: View and modify objects at runtime in your shortcuts.
Learn more how you can create your own shortcut applications with App Framework here.
Localization
Record Text to Speech is available in English, but the application is fully ready to be localized. I have developed an application, Localization Helper, that will assist you in localizing Record Text to Speech into your language.
- When the localization file is complete, submit a pull request on the Record Text to Speech GitHub page.
Version History
- 1.0.0: Released April 26, 2019. Initial release.
- 2.0.0: Released April 29, 2019. Rewrote using App Framework and Screen Recording.
License
Copyright (c) 2019 Adam Tow • tow.com • @atow
Permission is hereby granted, free of charge, to any person obtaining a copy of this software and associated documentation files (the "Software"), to deal in the Software without restriction, including without limitation the rights to use, copy, modify, merge, publish, distribute, sublicense, and/or sell copies of the Software, and to permit persons to whom the Software is furnished to do so, subject to the following conditions:
The above copyright notice and this permission notice shall be included in all copies or substantial portions of the Software.
THE SOFTWARE IS PROVIDED "AS IS", WITHOUT WARRANTY OF ANY KIND, EXPRESS OR IMPLIED, INCLUDING BUT NOT LIMITED TO THE WARRANTIES OF MERCHANTABILITY, FITNESS FOR A PARTICULAR PURPOSE AND NONINFRINGEMENT. IN NO EVENT SHALL THE AUTHORS OR COPYRIGHT HOLDERS BE LIABLE FOR ANY CLAIM, DAMAGES OR OTHER LIABILITY, WHETHER IN AN ACTION OF CONTRACT, TORT OR OTHERWISE, ARISING FROM, OUT OF OR IN CONNECTION WITH THE SOFTWARE OR THE USE OR OTHER DEALINGS IN THE SOFTWARE.
Latest Release Notes
2.0.2 - March 27, 2020, 5:40 a.m.
- Fix 404 file not found error that occurred for some users.
- Display Quick Look preview of video before saving for verification purposes.
Past versions
Feedback
Log in or sign up to leave feedback.
· 6 months, 1 week ago
· 6 months, 1 week ago
· 6 months, 1 week ago
· 6 months, 1 week ago
· 6 months, 1 week ago
· 6 months, 1 week ago
· 6 months, 1 week ago
· 6 months, 1 week ago
· 6 months, 1 week ago
· 6 months, 1 week ago
· 6 months, 1 week ago
· 6 months, 1 week ago
· 6 months, 1 week ago
· 4 months, 2 weeks ago
· 4 months, 2 weeks ago
· 4 months, 2 weeks ago
· 4 months, 2 weeks ago
· 4 months, 1 week ago
· 4 months, 1 week ago
· 4 months, 1 week ago
· 2 months, 3 weeks ago
· 2 months, 3 weeks ago
· 2 months, 3 weeks ago
· 1 month, 1 week ago
· 1 month, 1 week ago
· 1 month, 1 week ago
· 1 week, 5 days ago